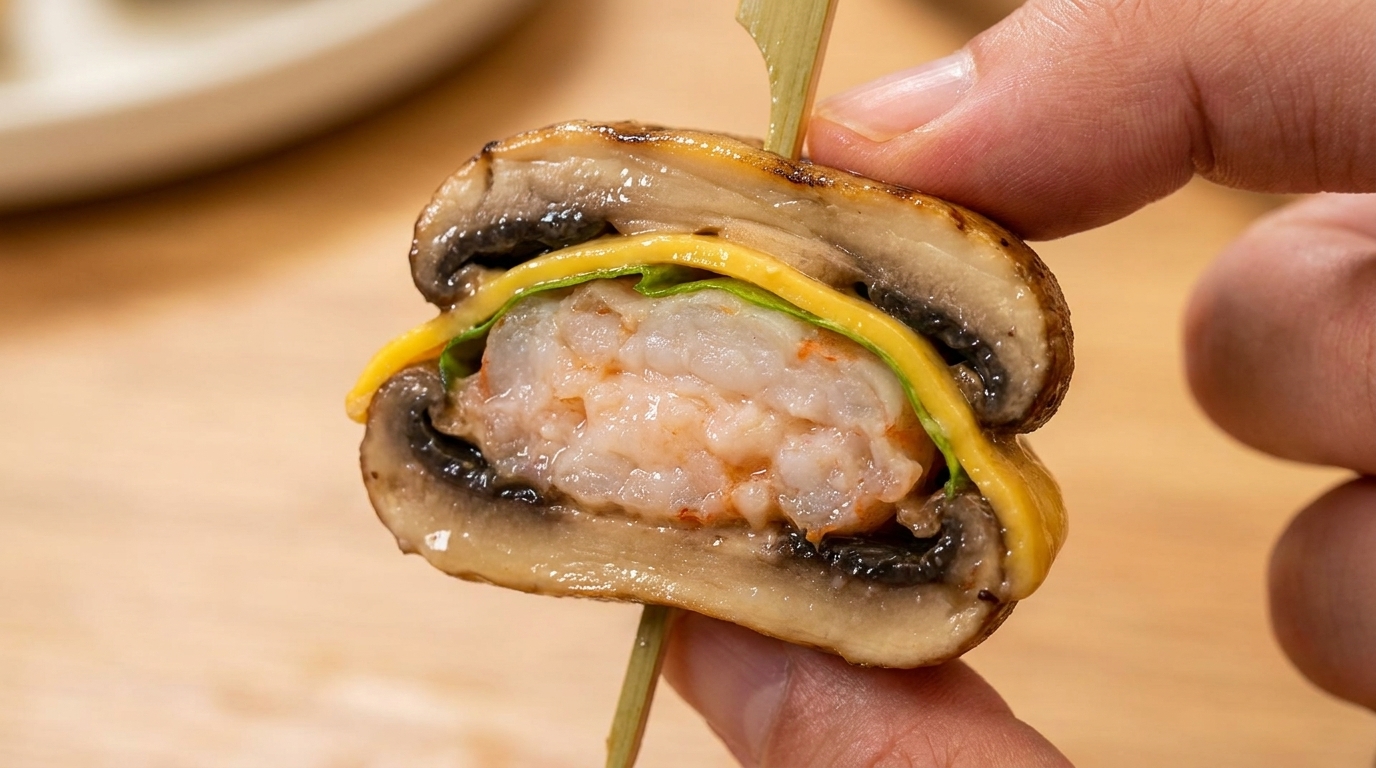
Juicy Mushroom Mini Burgers
Shrimp Paste
Savor these low-carb, umami-rich mushroom sliders featuring springy shrimp paste, melted cheese, and fresh greens between two perfectly seared portobello caps
Mini mushroom burgers are a clever, low-calorie alternative to traditional sliders, replacing doughy buns with juicy, pan-seared mushroom caps. The addition of springy shrimp paste provides a delightful texture contrast and a boost of savory protein. This dish is a popular choice for health-conscious foodies looking for a gourmet appetizer or a light main course that does not compromise on flavor.
Ingredients
- 10–12 pieces white or portobello mushroom caps
- 200 g raw shrimp paste
- 1 tbsp cooking oil
- to taste sea salt
- to taste black pepper
- 2 tbsp savory seasoning sauce
- 2 tbsp mayonnaise
- 1 tbsp ketchup
- 12 piece cucumber, thinly sliced
- 3–4 leaves green lettuce
- 3–4 slices cheddar cheese, cut into squares
Instructions
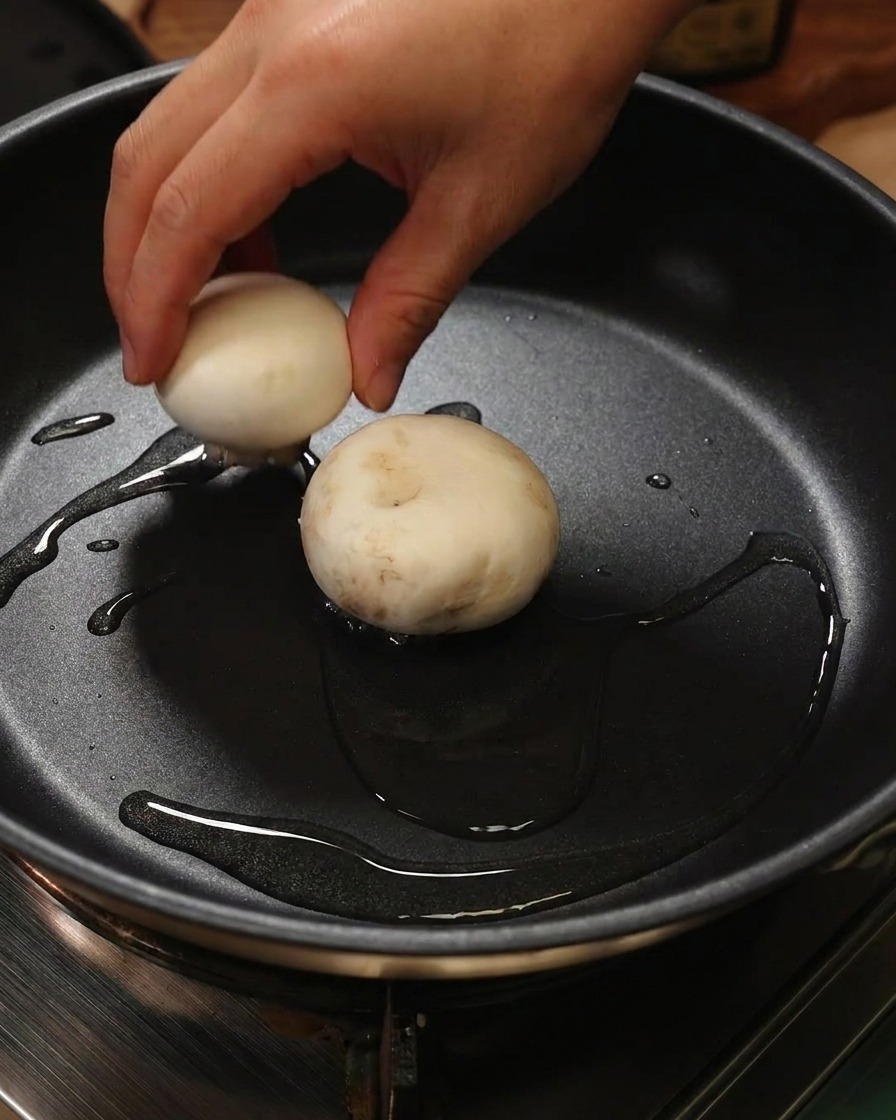
- 1Sear the mushroom caps
Begin by preparing the buns for your mini burgers. Heat a small amount of oil in a pan over medium heat and use tongs to place the white mushroom caps face down. Searing the tops first ensures they are tender and develop a savory, golden-brown crust that adds structural integrity to the burger.
Tip: Ensure the pan is properly heated before adding the mushrooms to get an immediate sear; this prevents them from steaming in their own juices. - 2Flip for even cooking
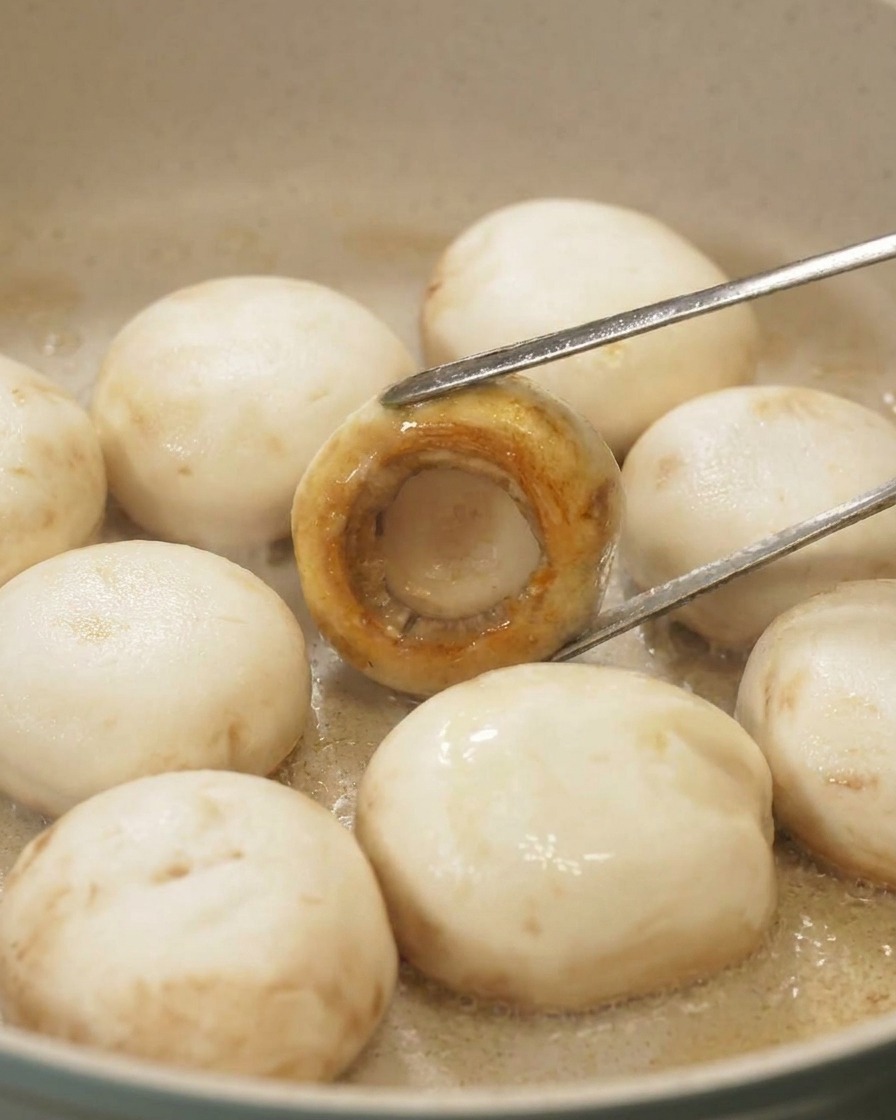
Once the tops of the mushrooms have developed a rich, golden-brown color, use tongs to carefully flip them over. This browning process, known as the Maillard reaction, is essential for creating the deep, umami flavor that makes these mushroom burgers so satisfying.
Tip: If the mushrooms stick slightly, give them another thirty seconds; they will usually release naturally once the sear is complete. - 3Season the mushroom buns
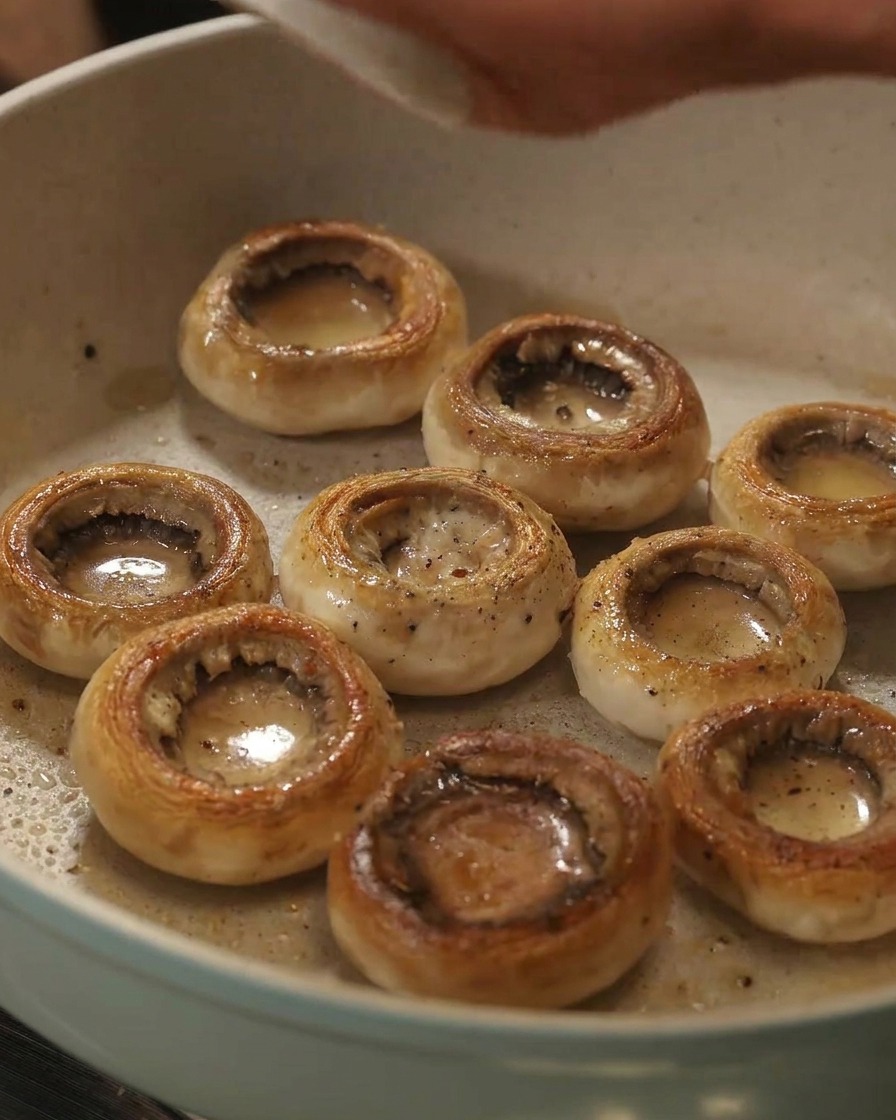
With the mushrooms flipped, sprinkle a generous amount of freshly cracked black pepper and sea salt over the grilled surfaces. Simple seasoning at this stage allows the natural earthiness of the mushrooms to shine while providing a savory base for the shrimp filling.
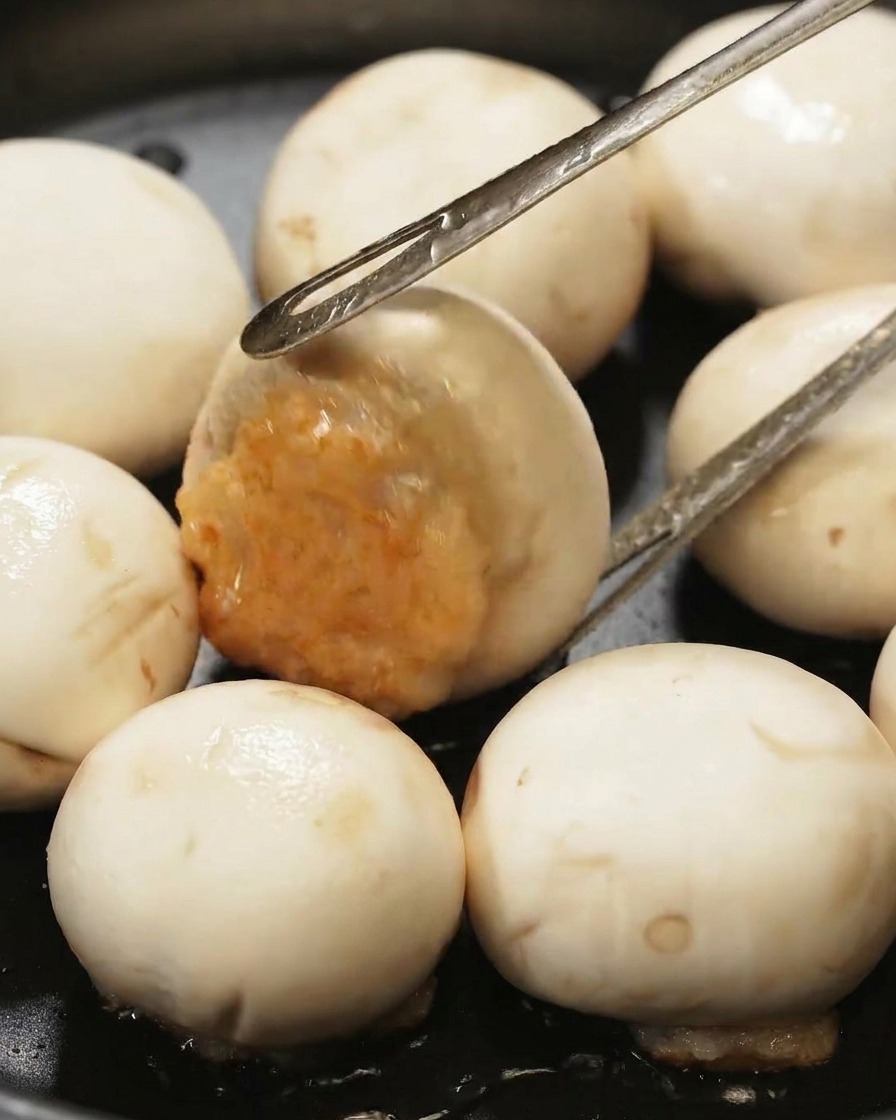
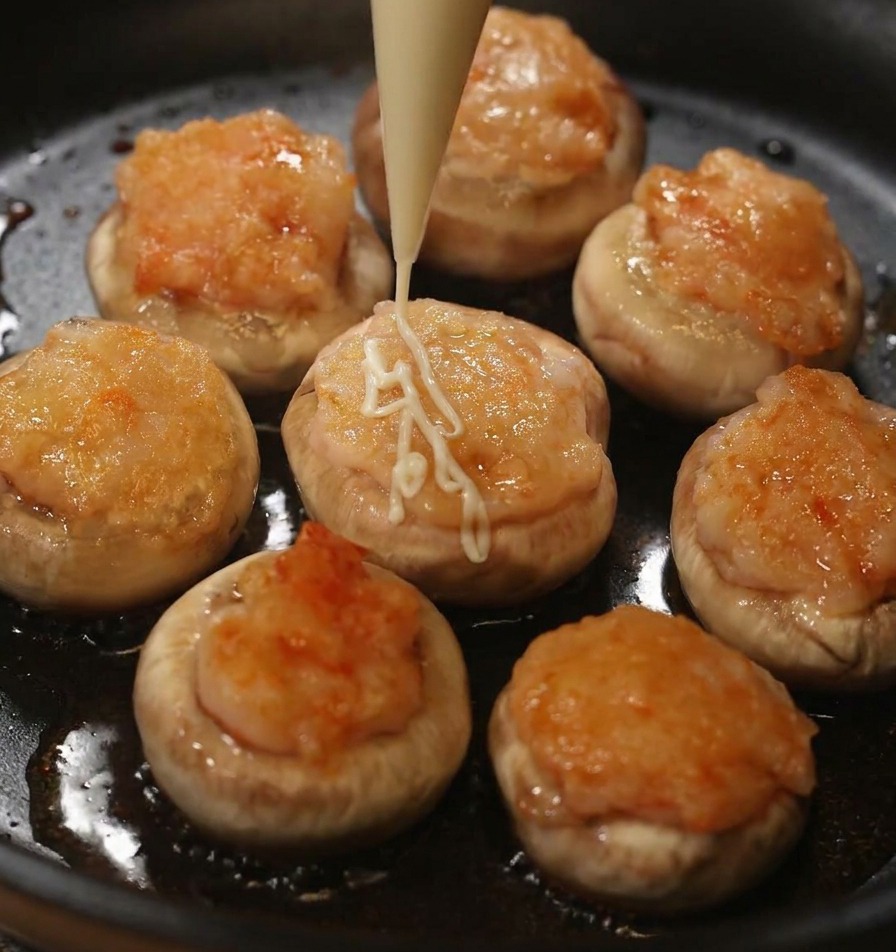
Tip: Using sea salt or kosher salt provides a better texture and more controlled salinity than fine table salt. - 4Fill with shrimp paste
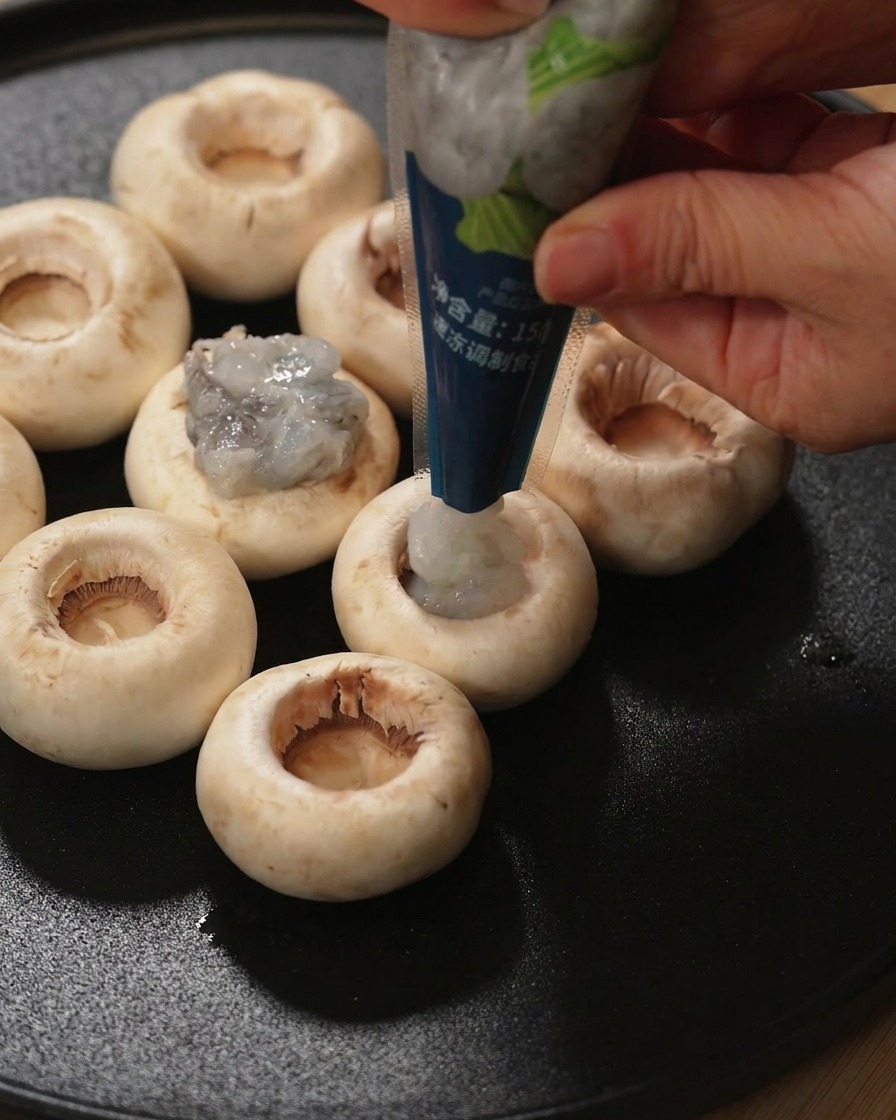
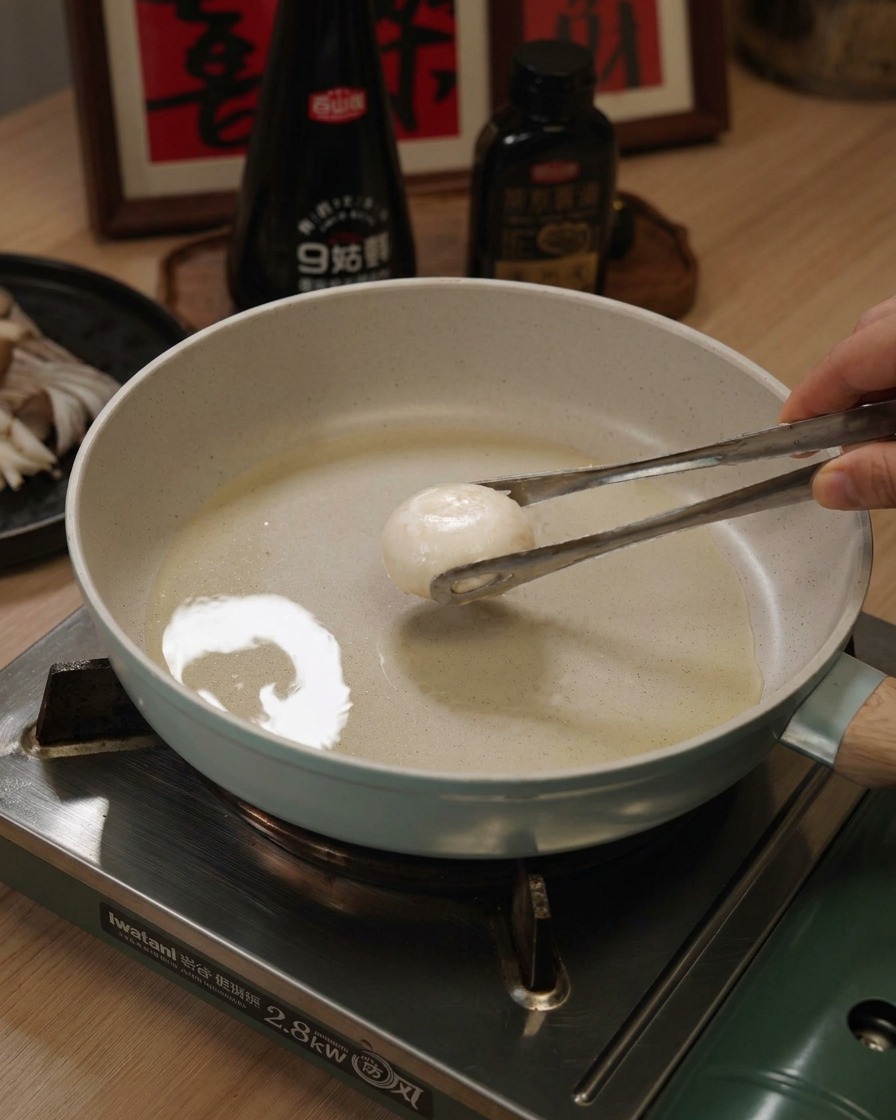
Prepare the second batch of mushrooms by removing the stems to create a cavity. Squeeze raw shrimp paste directly into the hollow centers of the fresh mushroom caps. This springy, flavorful paste serves as the high-protein patty for your mini burgers.
Tip: If you are making your own paste, ensure the shrimp is pulsed into a fine, tacky consistency so it adheres well to the mushroom. - 5Compact the filling
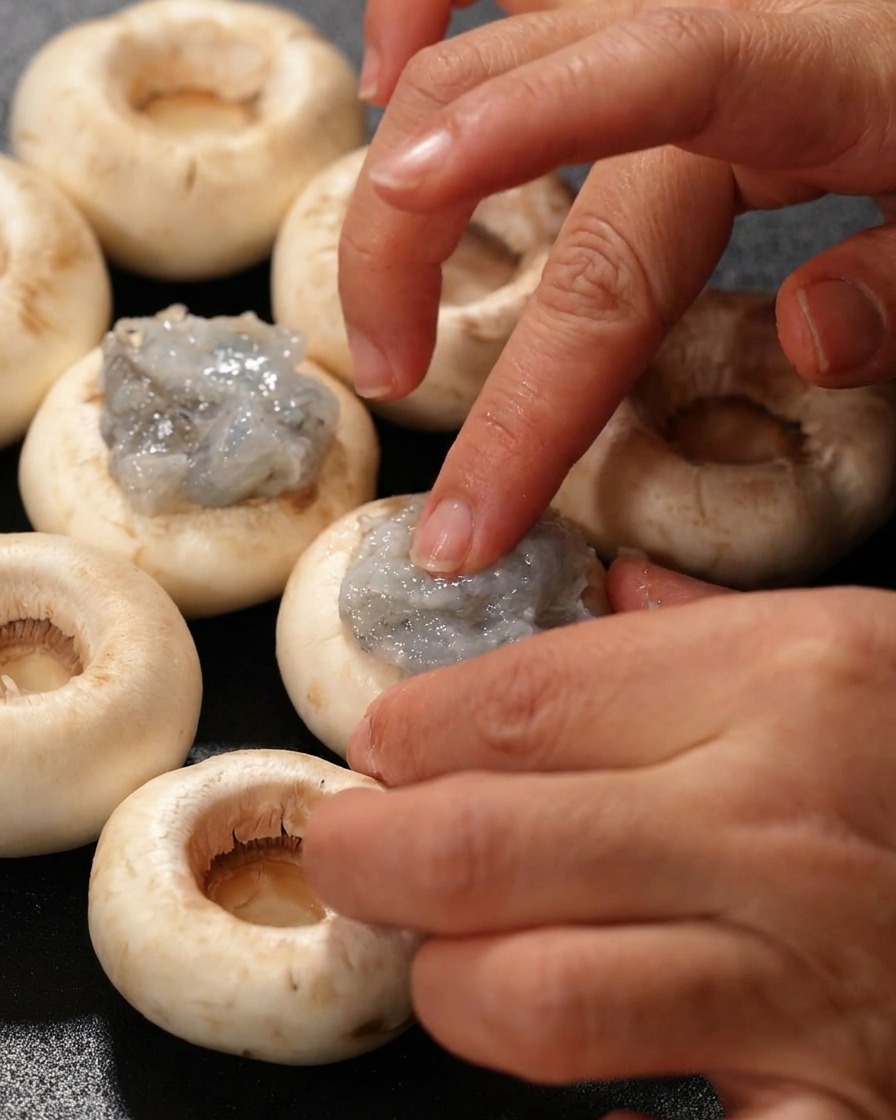
Use your finger or a small spoon to press the shrimp paste firmly into the mushroom cavity, smoothing out the surface. Compacting the filling ensures that the paste stays securely inside the mushroom during frying and creates a uniform shape for easy assembly.
Tip: Lightly coat your fingertip with a drop of oil or water to prevent the sticky shrimp paste from clinging to your skin. - 6Fry the shrimp patties
Add a touch more oil to the pan if necessary and place the stuffed mushrooms shrimp-side down into the heat. Frying the shrimp side first allows the paste to set quickly and develop a slightly crispy exterior while the mushroom remains juicy and tender.
Tip: Maintain medium-low heat during this step to ensure the shrimp paste cooks all the way through without burning the mushroom exterior. - 7Flip to cook the shrimp paste
Once the bottom of the mushroom caps are fried, carefully flip each piece over using tongs. This allows the shrimp paste filling to come into direct contact with the pan, where it will cook until it becomes opaque, firm, and beautifully browned.
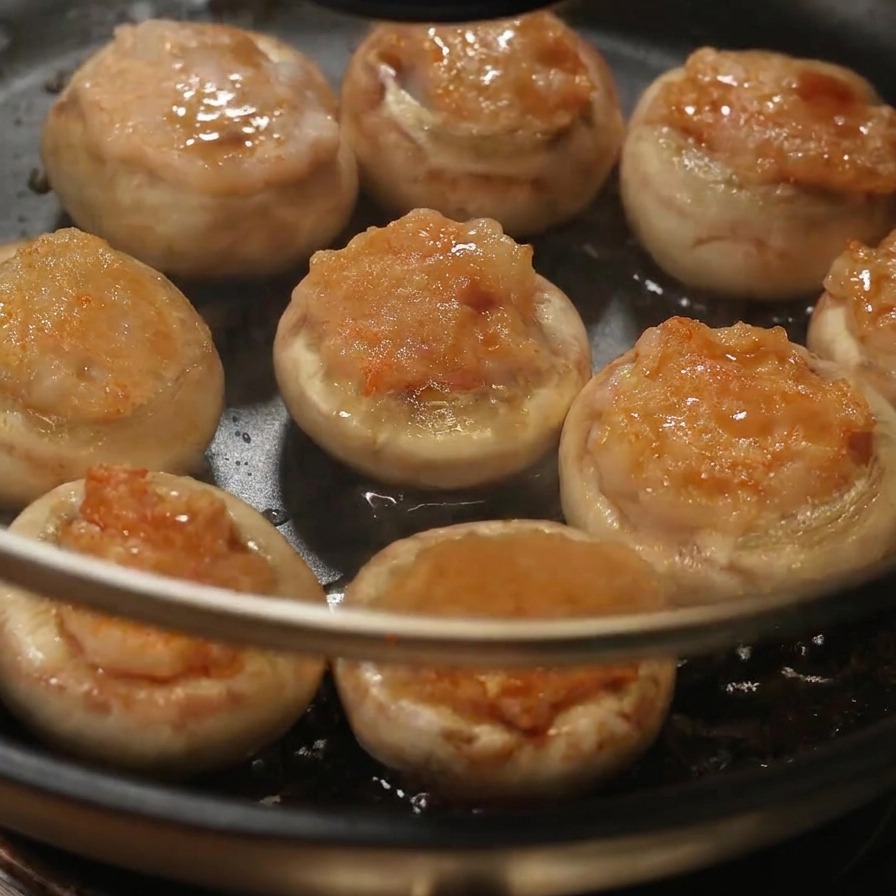
Tip: Gently press down on the mushrooms after flipping to ensure the shrimp paste makes good contact with the pan for an even sear. - 8Season with savory sauce
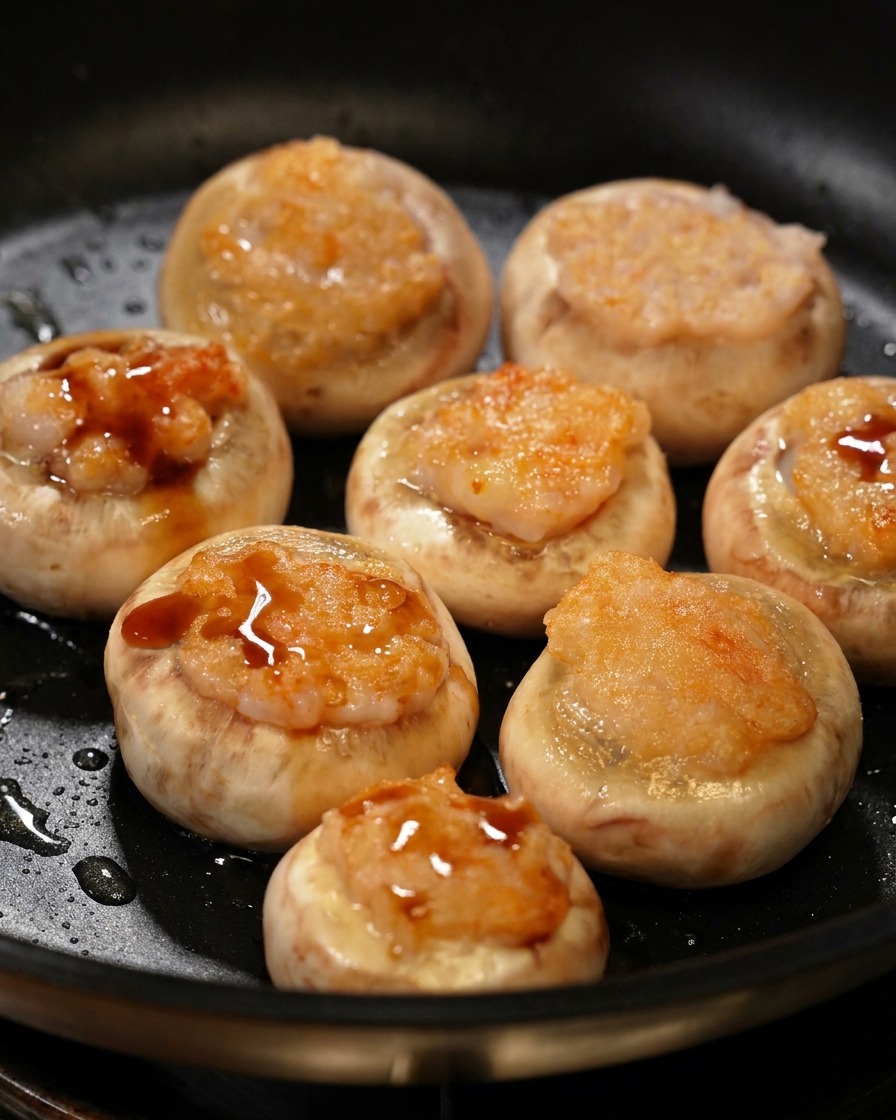
Drizzle a circle of the dark savory seasoning sauce over the cooked shrimp paste. The sauce will bubble in the hot pan, infusing the mushrooms and shrimp with a rich, umami flavor while creating a light glaze.
Tip: If the pan seems too dry, you can add a tablespoon of water along with the sauce to help it distribute more evenly. - 9Simmer under the lid
Place a glass lid over the pan and turn the heat to low. Let the mushrooms simmer and steam for about 3 minutes. This gentle cooking method ensures the mushrooms become tender while keeping the shrimp paste juicy and fully cooked.
Tip: Using a glass lid is helpful so you can keep an eye on the moisture levels without uncovering the pan and letting the steam escape. - 10Drizzle with mayonnaise
Once the shrimp-filled mushrooms have simmered and are fully cooked, squeeze a generous amount of mayonnaise in a decorative pattern over the tops. This adds a creamy texture and a rich flavor that complements the springy shrimp paste and earthy mushrooms.
Tip: You can use a piping bag or a squeeze bottle with a fine tip to get clean, even lines across the mushroom tops. - 11Garnish with ketchup
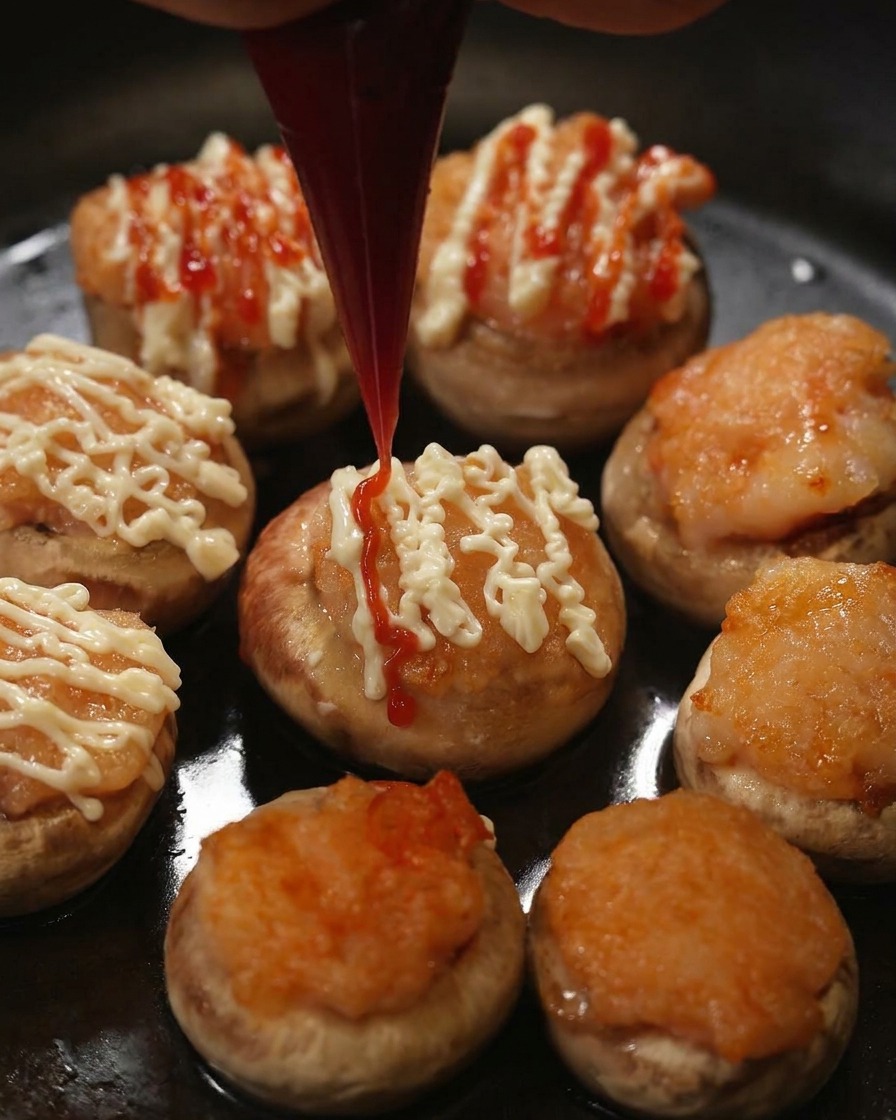
Add small drops of red ketchup on top of the mayonnaise layer. This combination of sauces adds a creamy, tangy, and slightly sweet finish to the savory mushroom burgers, enhancing both the look and the taste.
Tip: For a prettier presentation, you can use a small piping bag or a squeeze bottle to create neat dots or a zigzag pattern. - 12Add a crisp cucumber slice
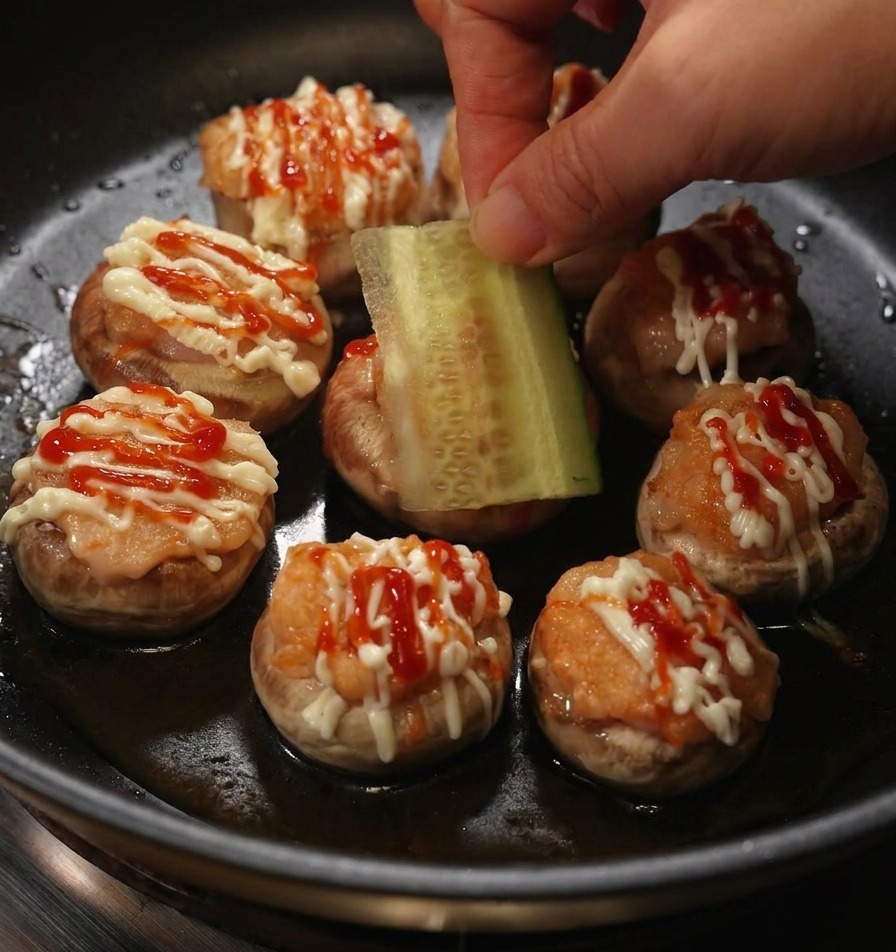
Carefully place a thin, fresh slice of cucumber onto each mushroom burger. This adds a cool, refreshing crunch that perfectly complements the warm, tender mushroom and the richness of the sauces.
Tip: Pat the cucumber slices dry with a paper towel before adding them to prevent them from sliding off the sauce layer. - 13Add fresh lettuce
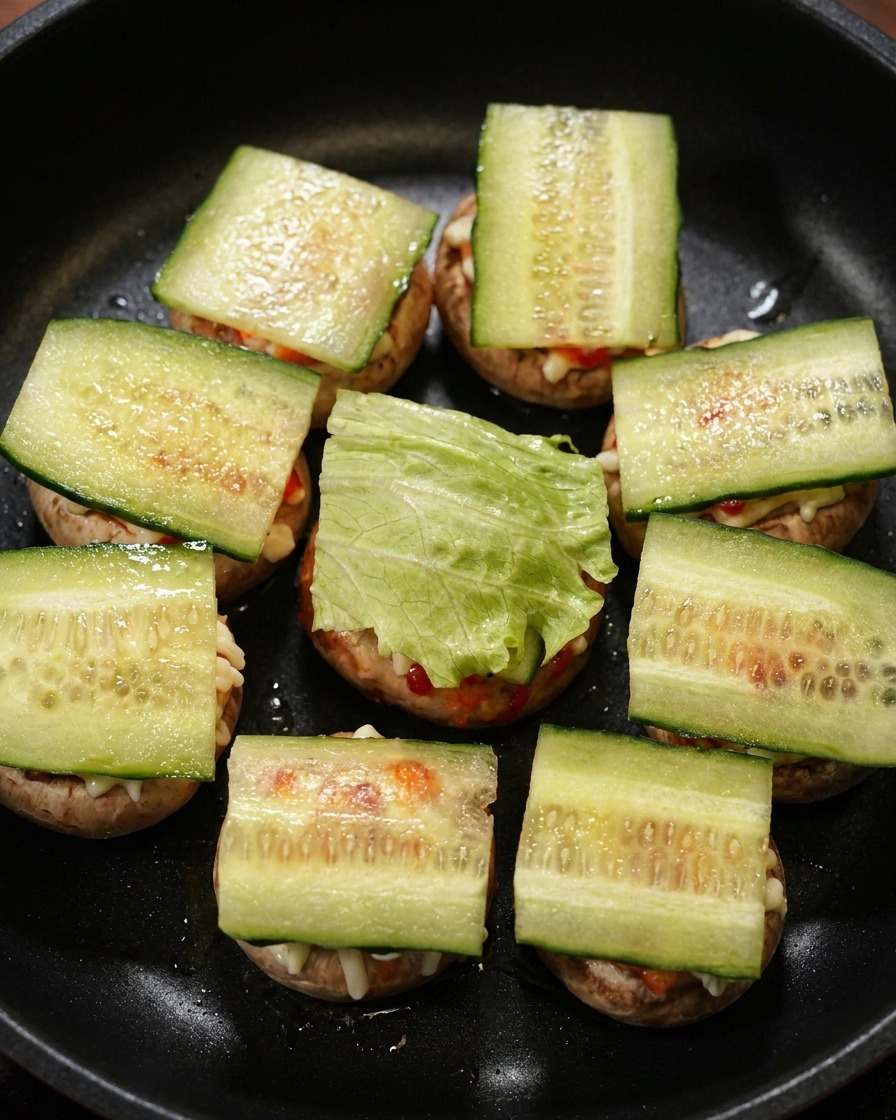
Place a small piece of fresh, crisp green lettuce over the cucumber slice. This layer adds a refreshing crunch and a vibrant color contrast to the warm burger.
Tip: Pat the lettuce and cucumber dry with a paper towel before adding them to ensure the burgers dont become soggy. - 14Layer with cheese
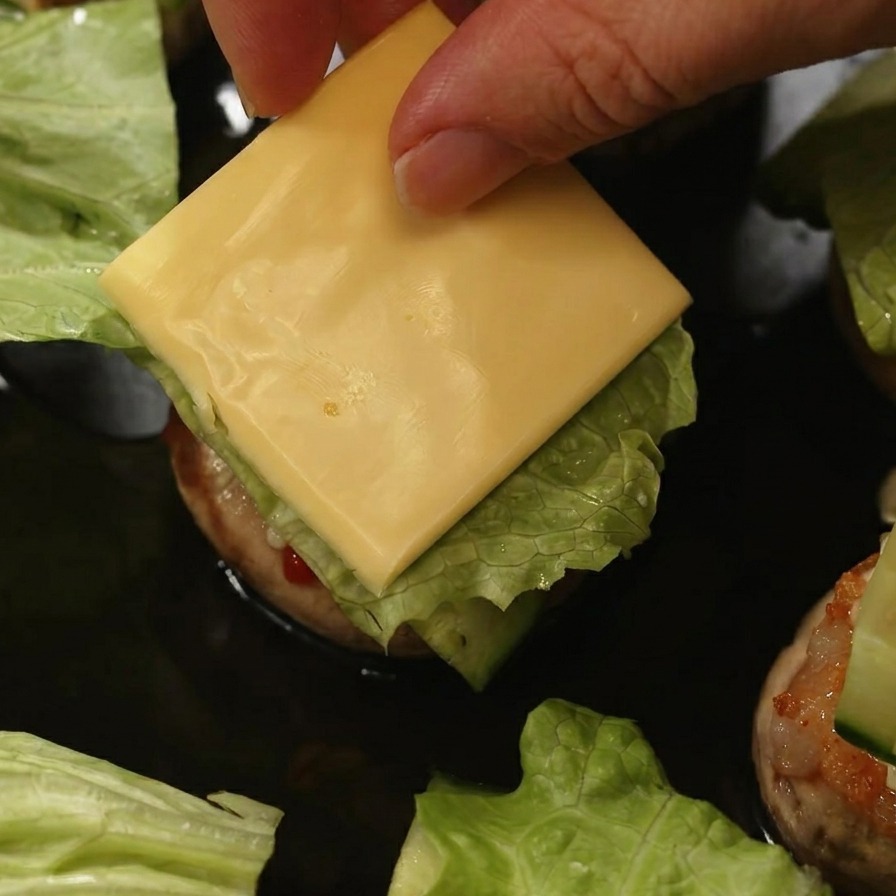
Place a square slice of cheese over the lettuce on each burger. Using a mild cheese like cheddar or American works perfectly for these mini burgers, as it provides a smooth, creamy finish that holds the ingredients together.
Tip: For a perfect fit, you can cut standard-sized cheese slices into four smaller squares. - 15Melt the cheese
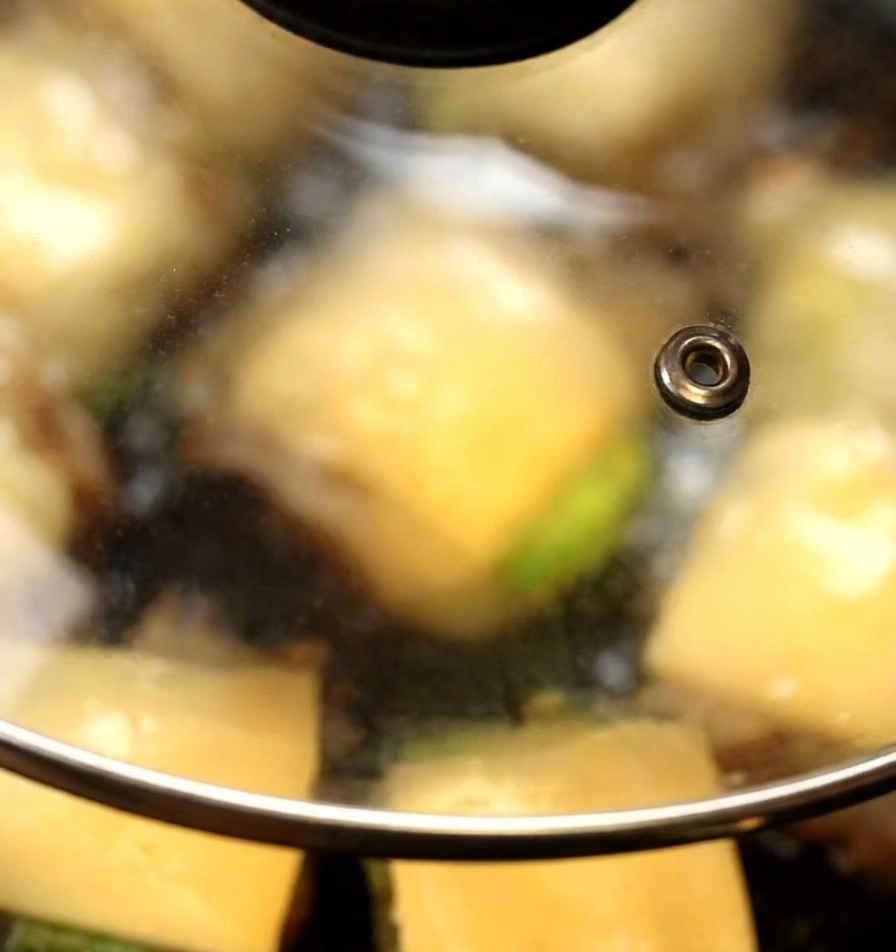
Cover the pan with a lid and continue to simmer on low heat for about 2 minutes. The trapped steam will melt the cheese until it is soft and gooey, creating a delicious topping that blankets the vegetables and meat.
Tip: Keep the heat very low during this stage to avoid burning the bottom of the mushroom caps while waiting for the cheese to melt. - 16Assemble the mini burgers
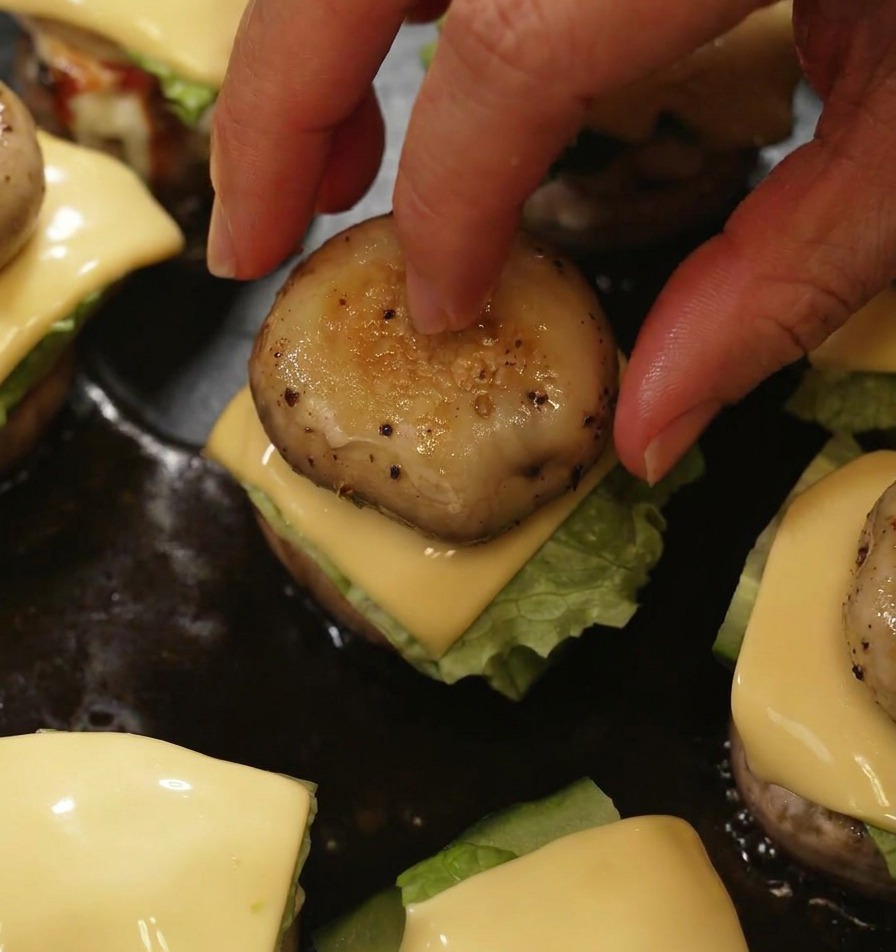
Complete the assembly by placing the previously grilled mushroom caps on top of the melted cheese. To keep the layers secure and make them easy to serve, insert a bamboo skewer through the center of each mini burger.
Tip: If the mushroom caps have cooled down, you can place them in the pan for 30 seconds before assembly to warm them back up.