Classic Japanese Oyakodon (Chicken
Egg Rice Bowl)
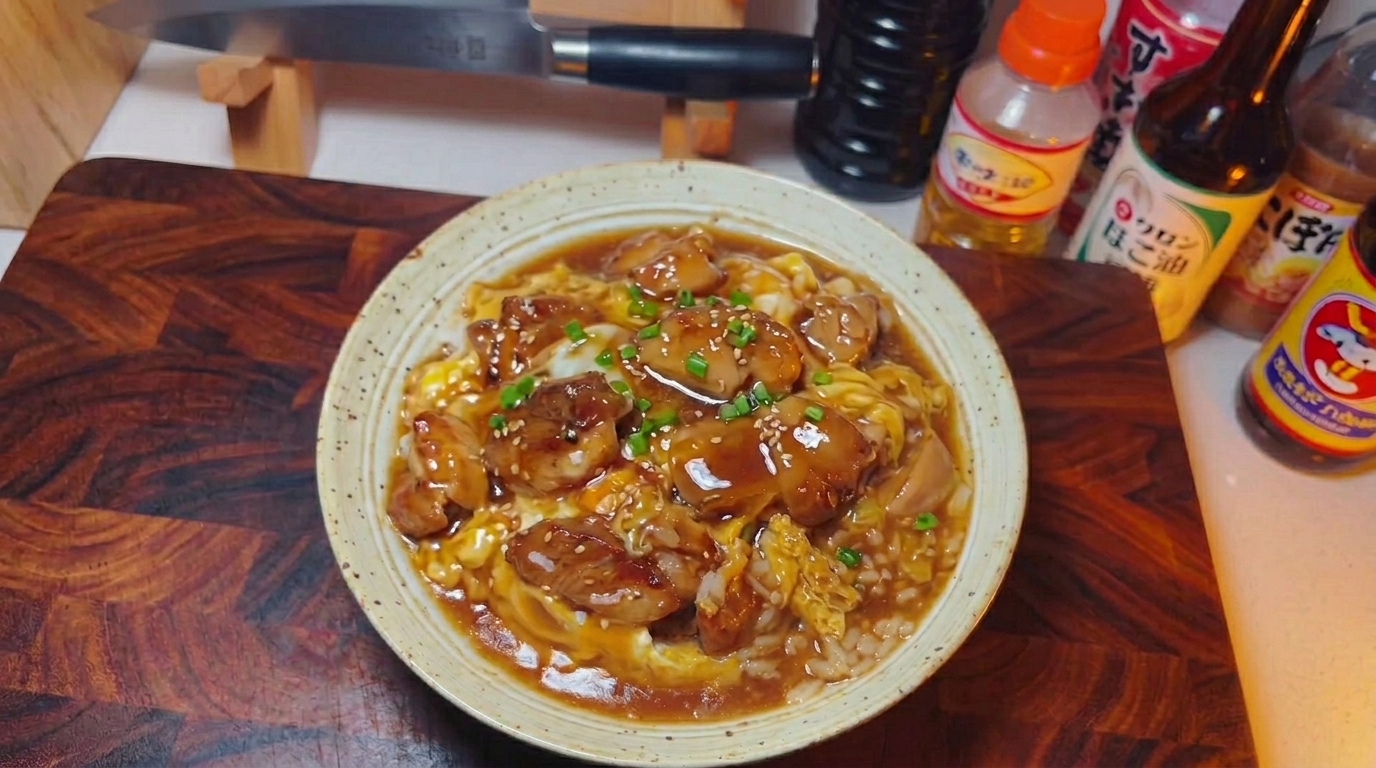
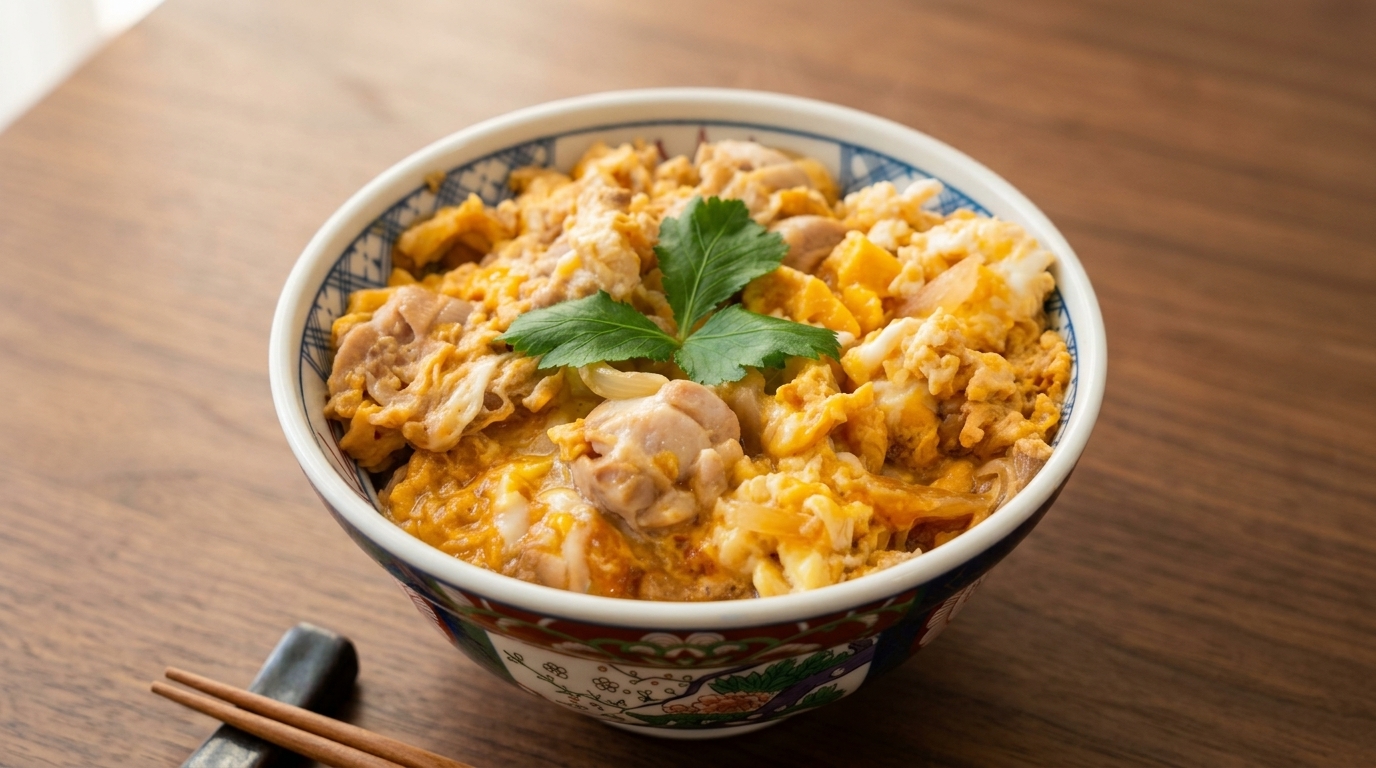
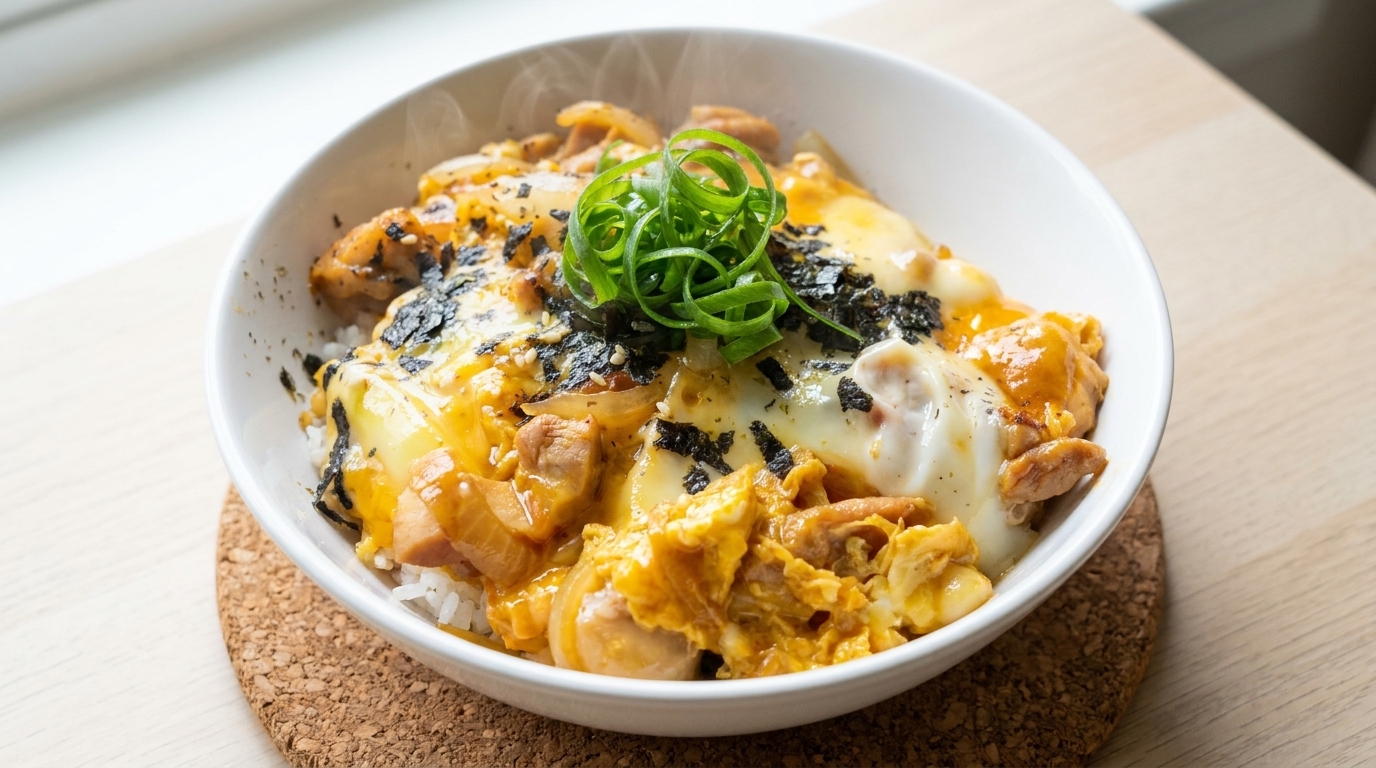
A soul-warming Japanese staple featuring tender chicken thighs and silky, soft-cooked eggs simmered in a sweet-savory dashi broth over fluffy steamed rice.
Oyakodon literally translates to parent and child bowl, a poetic nod to its two main ingredients: chicken and egg. It is a quintessential Japanese donburi (rice bowl) that perfectly balances the savory depth of soy sauce with the natural sweetness of sautéed onions and mirin. This dish is cherished for its simplicity, providing a complete and comforting meal that can be prepared in under twenty minutes.
Ingredients
- 1 cup short-grain Japonica rice (e.g., Akita Komachi)
- 250 g chicken thighs (boneless and skin-on)
- 12 white onion
- 3 large eggs
- 1 tbsp light soy sauce
- 1 tbsp mirin
- 4 tbsp water
- 1 tsp sugar
- 1 pinch MSG (optional)
- 1 tbsp rice wine (for marinade)
- 1 tsp light soy sauce (for marinade)
- to taste shredded nori seaweed
- to taste green onions
Instructions
- 1Measure the rice

Start by measuring out the dry rice grains. For this recipe, a high-quality short-grain Japonica rice like Akita Komachi is ideal, as it provides a sweet aroma and a slightly sticky texture that perfectly complements the savory Oyakodon sauce.
Tip: Use the standard measuring cup that came with your rice cooker to ensure the ratio of water to rice is perfectly balanced for a fluffy result. - 2Wash the rice
Place the inner pot under cold running water. Use your hand to gently swirl the grains in a circular motion to release excess surface starch. Drain the cloudy water and repeat this process two to three times until the water runs mostly clear.
Tip: Avoid scrubbing the rice too vigorously; a gentle swirl is enough to clean the grains without breaking them. - 3Slice the chicken thighs
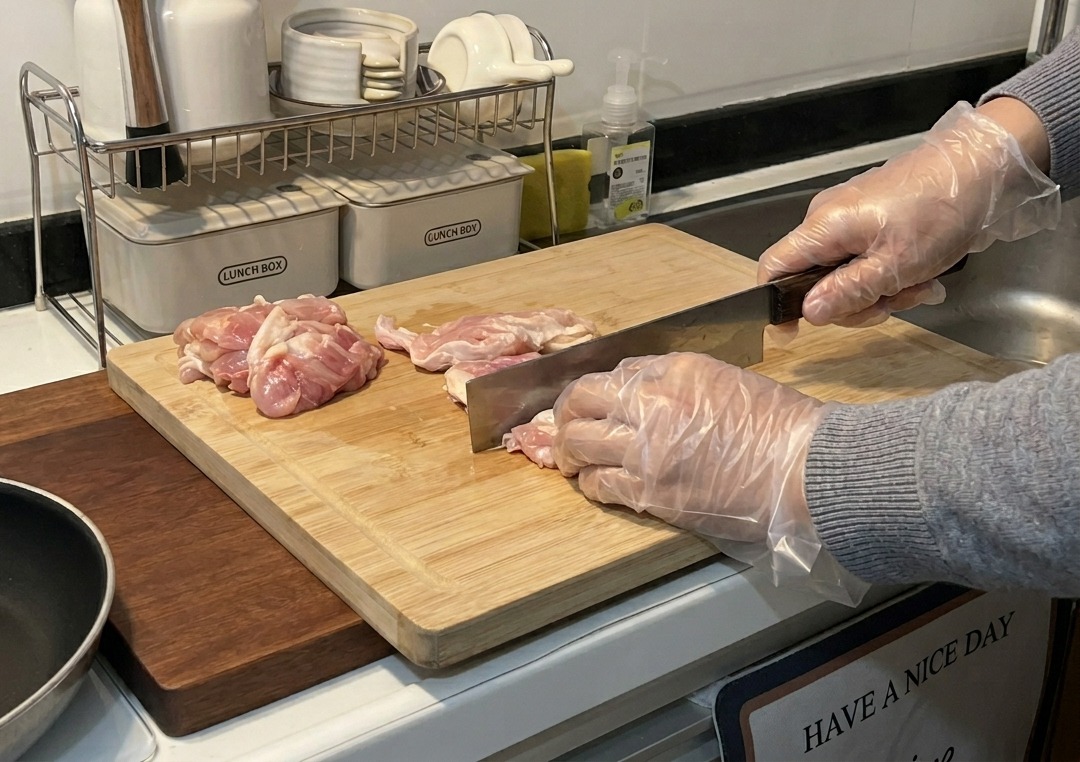
Trim any excess fat from the chicken thighs and cut the meat into uniform, bite-sized pieces. Slicing them into even portions ensures that the chicken cooks at the same rate and remains tender throughout the simmering process.
Tip: Chicken thighs are preferred over breast meat for Oyakodon because they stay juicy and flavorful even after soaking up the delicious soup. - 4Marinate the chicken
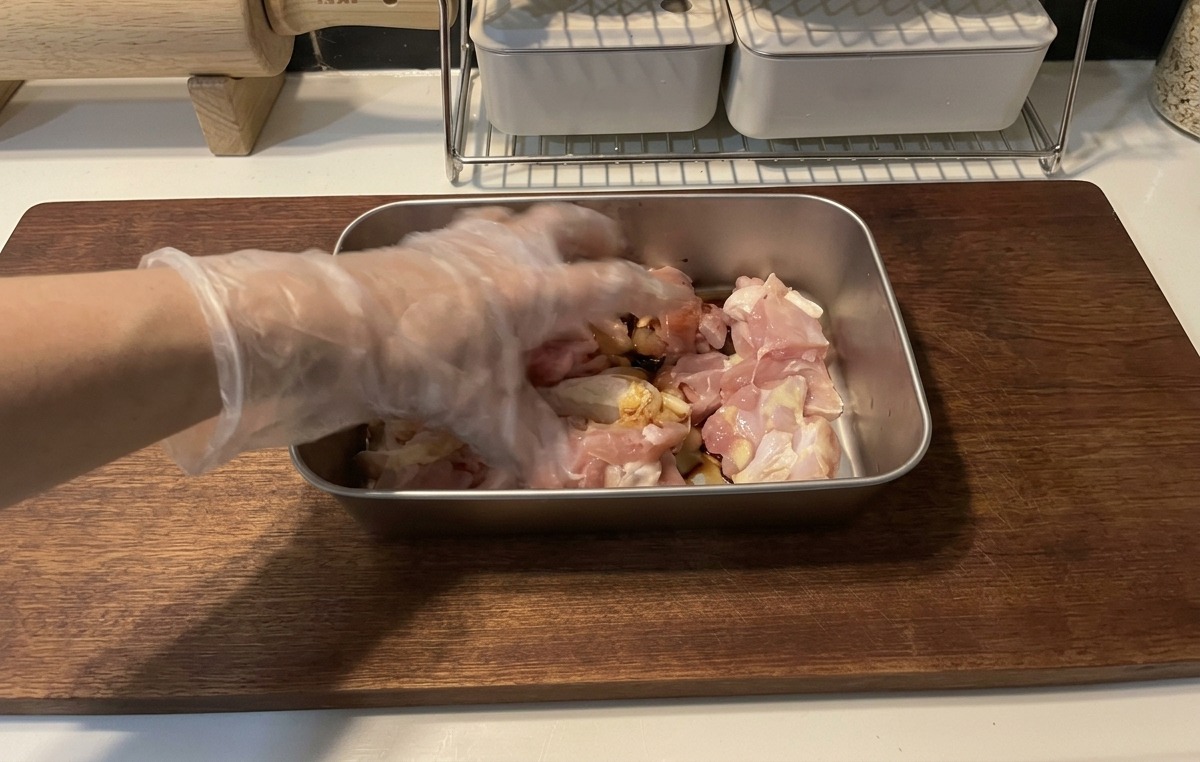
Cut the chicken thigh meat into bite-sized pieces and place them in a metal tray. Add a splash of rice wine and light soy sauce, then mix thoroughly by hand to ensure every piece is evenly coated. This initial seasoning helps tenderize the meat and infuses it with a foundational savory flavor before cooking.
Tip: Using your hands to mix allows you to massage the marinade into the meat fibers more effectively than using a spoon or chopsticks. - 5Prepare the onion
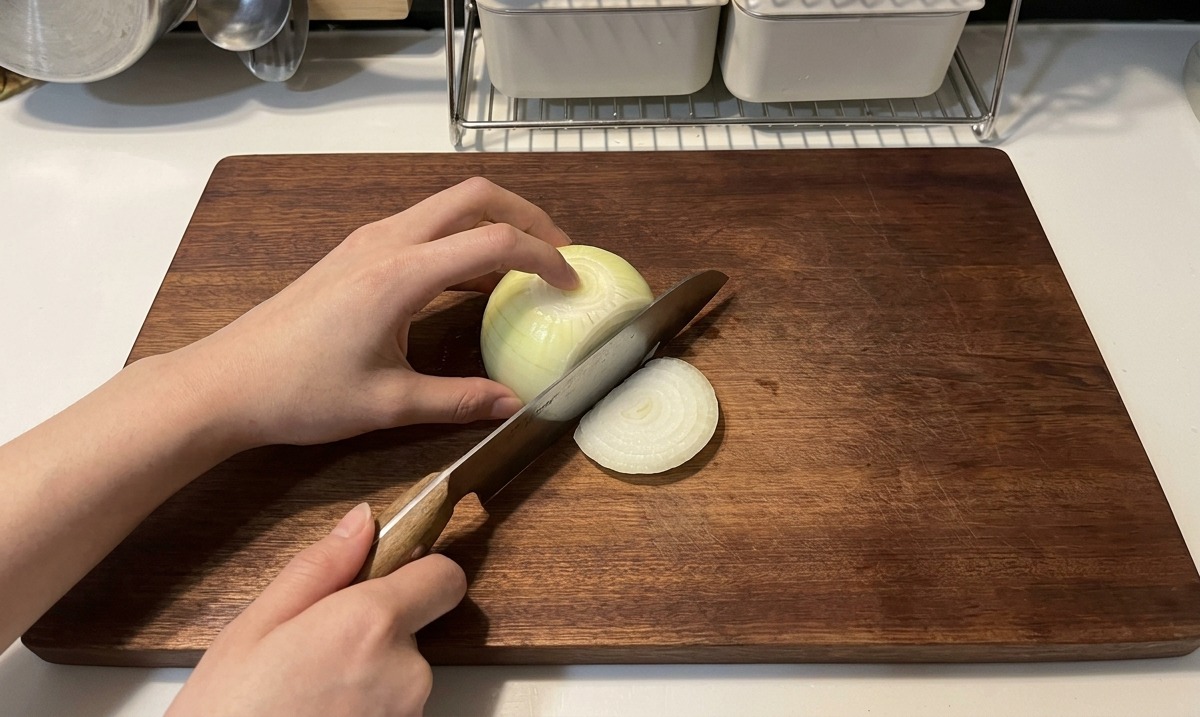
Peel a fresh white onion and cut it in half. Slice it into thin, even half-moon strips. These onions will provide a natural sweetness to the dish and will be added in two batches to create layers of texture.
Tip: Try to keep the slices thin so they soften quickly and absorb the savory broth more effectively. - 6Crack the eggs
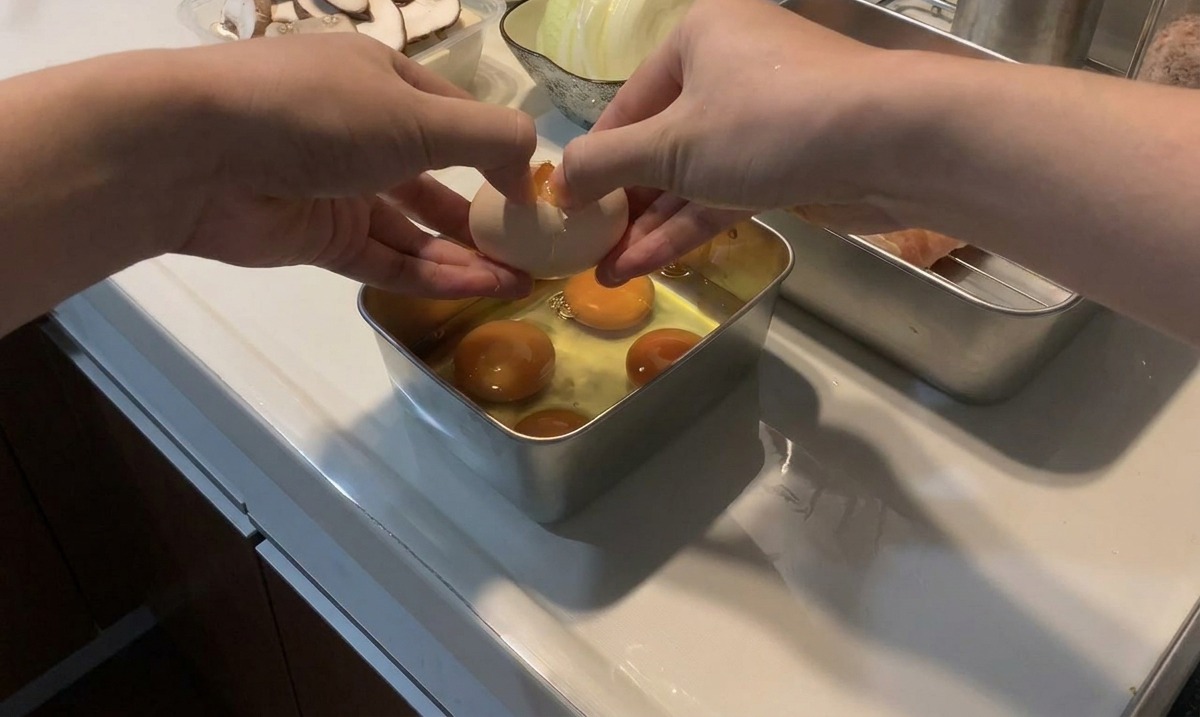
Crack three to four fresh eggs into a flat tray or bowl. Using high-quality eggs is essential for this dish, as the rich yolks provide both the vibrant golden color and the creamy mouthfeel that defines a traditional Oyakodon.
Tip: Keep the yolks and whites only roughly mixed rather than thoroughly beaten; this gives the final dish a beautiful marbled appearance. - 7Whisk roughly for texture
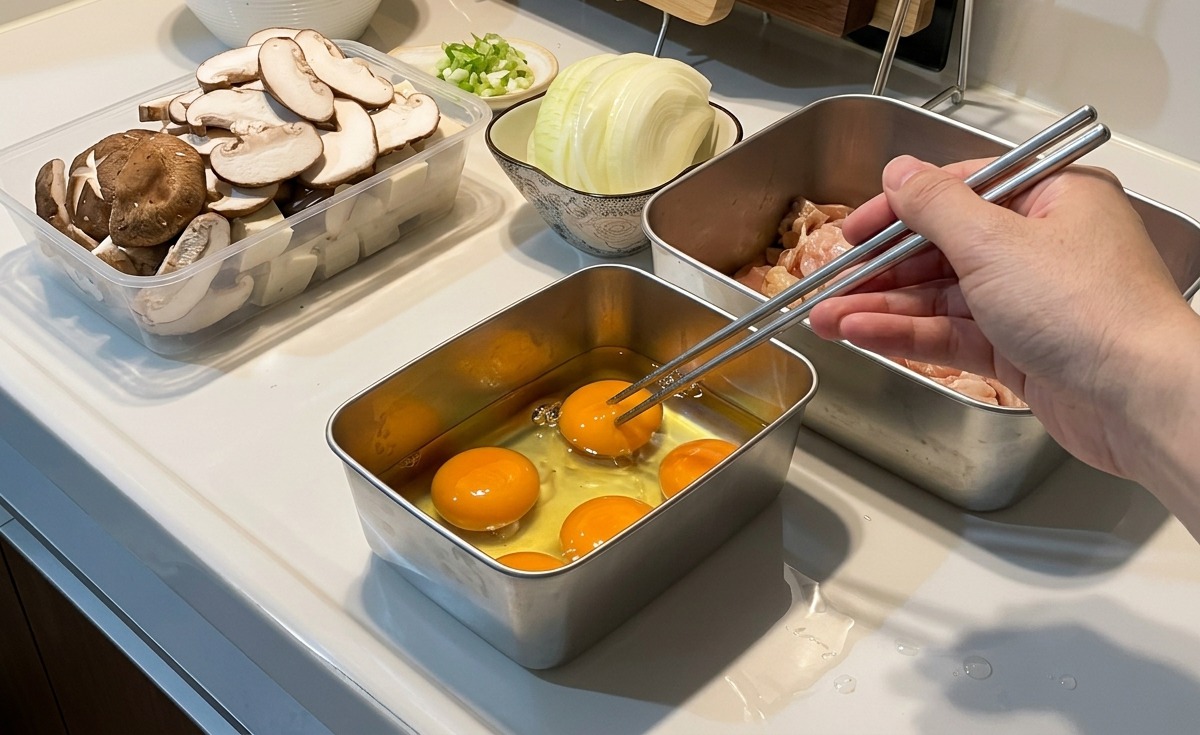
Use chopsticks to gently poke and break the yolks but avoid beating them thoroughly. You want a rough marbled mixture where the whites and yolks remain somewhat distinct. This specific technique ensures a bouncy silky texture in the final dish.
Tip: If you want an authentic texture only stir the eggs three to four times because over mixing will result in a flat uniform omelet texture instead of silky ribbons. - 8Prepare the Oyakodon sauce
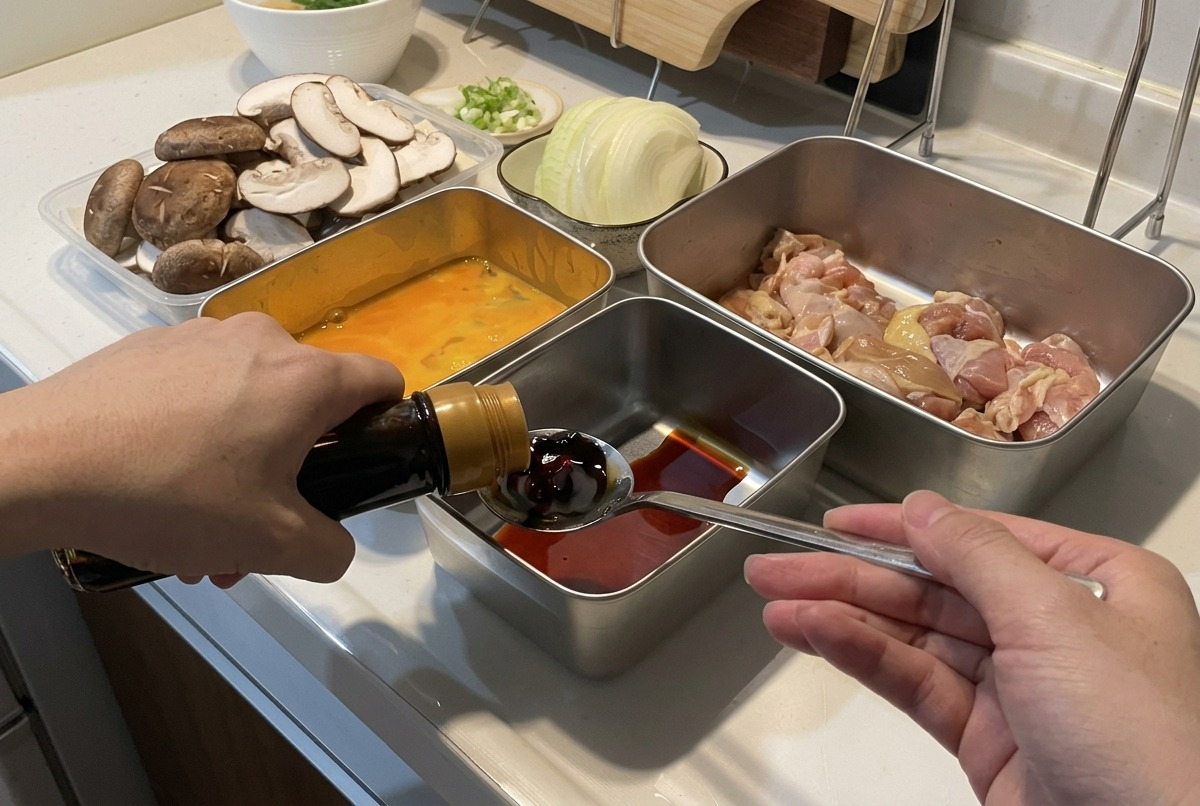
In a shallow metal tray or bowl, combine light soy sauce, mirin, and water. A common ratio for a balanced flavor is one part soy sauce, one part mirin, and four parts water. Add a small amount of sugar and a pinch of MSG to enhance the umami. Stir well to ensure the sugar is fully dissolved before cooking.
Tip: Using a metal tray allows for easy measuring and quick pouring when youre ready to add the sauce to the hot pan. - 9Sear the chicken
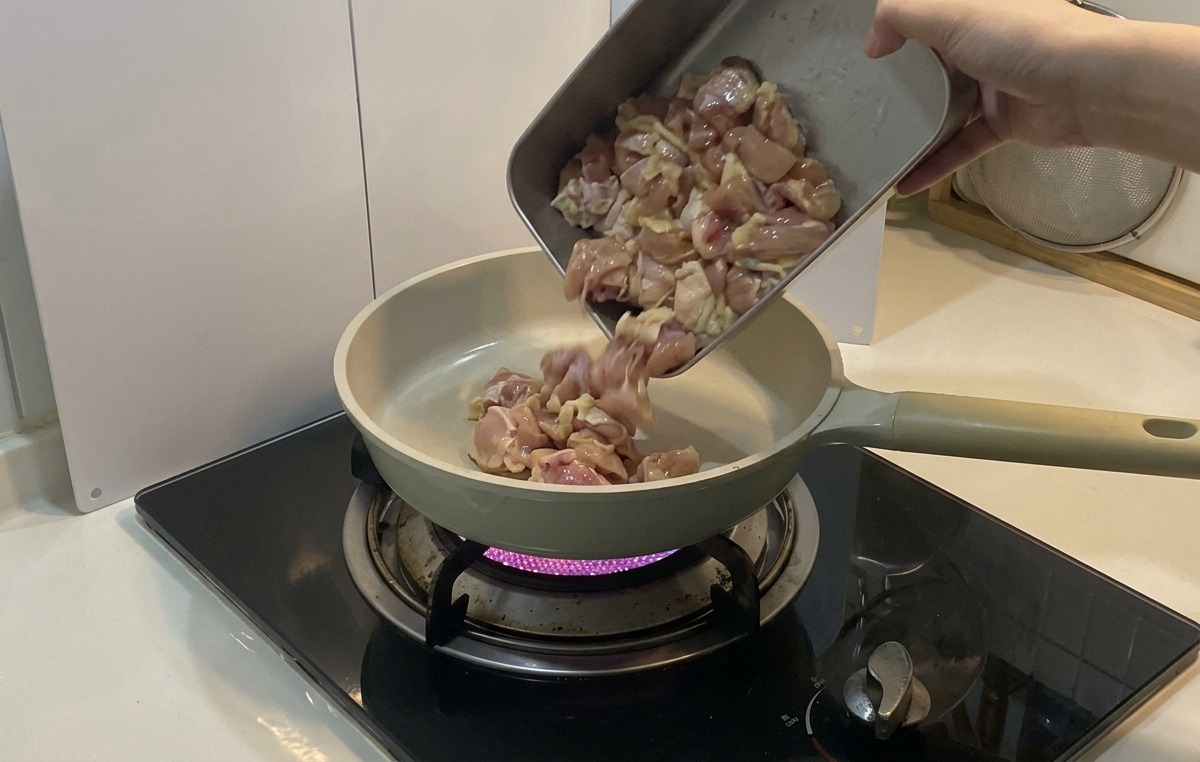
Heat a frying pan over medium-high heat and carefully place the marinated chicken pieces skin-side down. Searing the skin first allows the fat to render out, making the chicken crispy and golden-brown. This step adds a layer of toasted flavor that makes the Oyakodon much more satisfying.
Tip: Dont move the chicken too early; let it sit undisturbed for a minute or two to develop a nice crust. - 10Sauté with onions

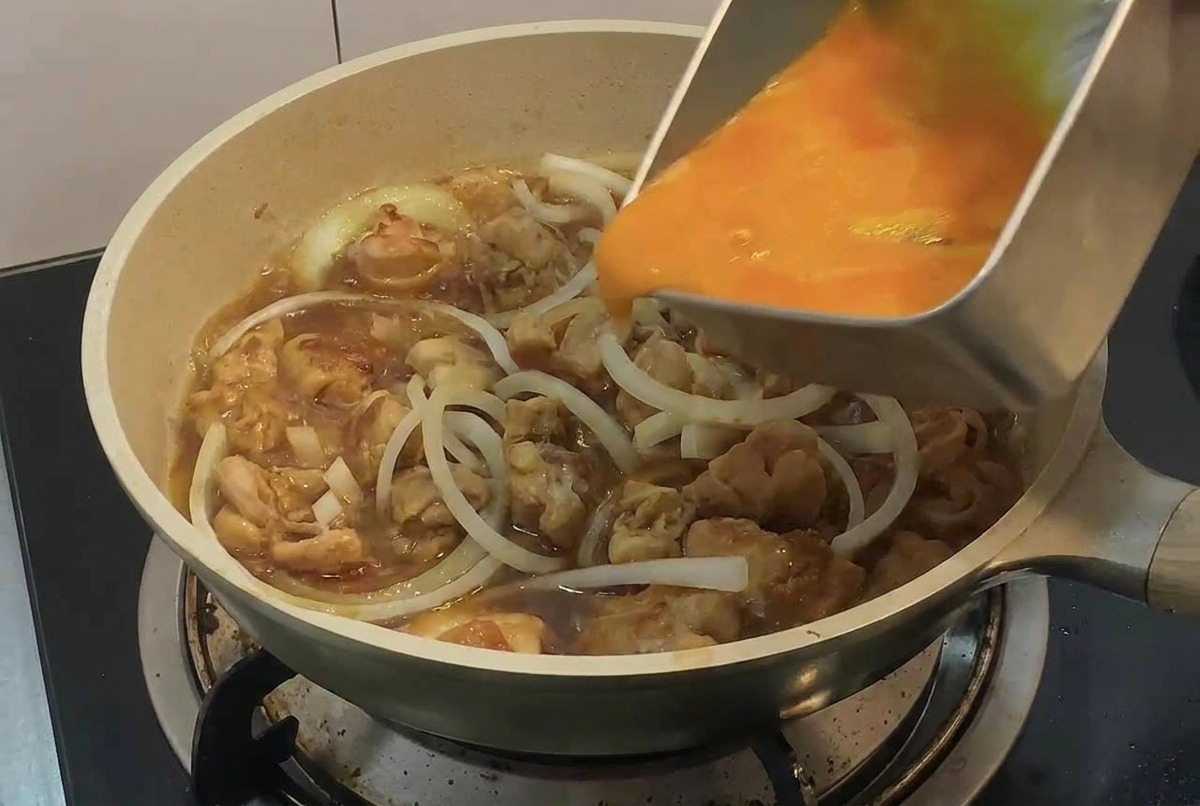
Once the chicken has developed some color, toss in the sliced white onions. Sauté them together so the onions soften and begin to caramelize in the rendered chicken fat. The onions provide a natural sweetness that balances the salty-sweet profile of the Oyakodon sauce.
Tip: If you like a bit of texture, save a few raw onion slices to add right before the egg for a slight crunch. - 11Add the cooking sauce
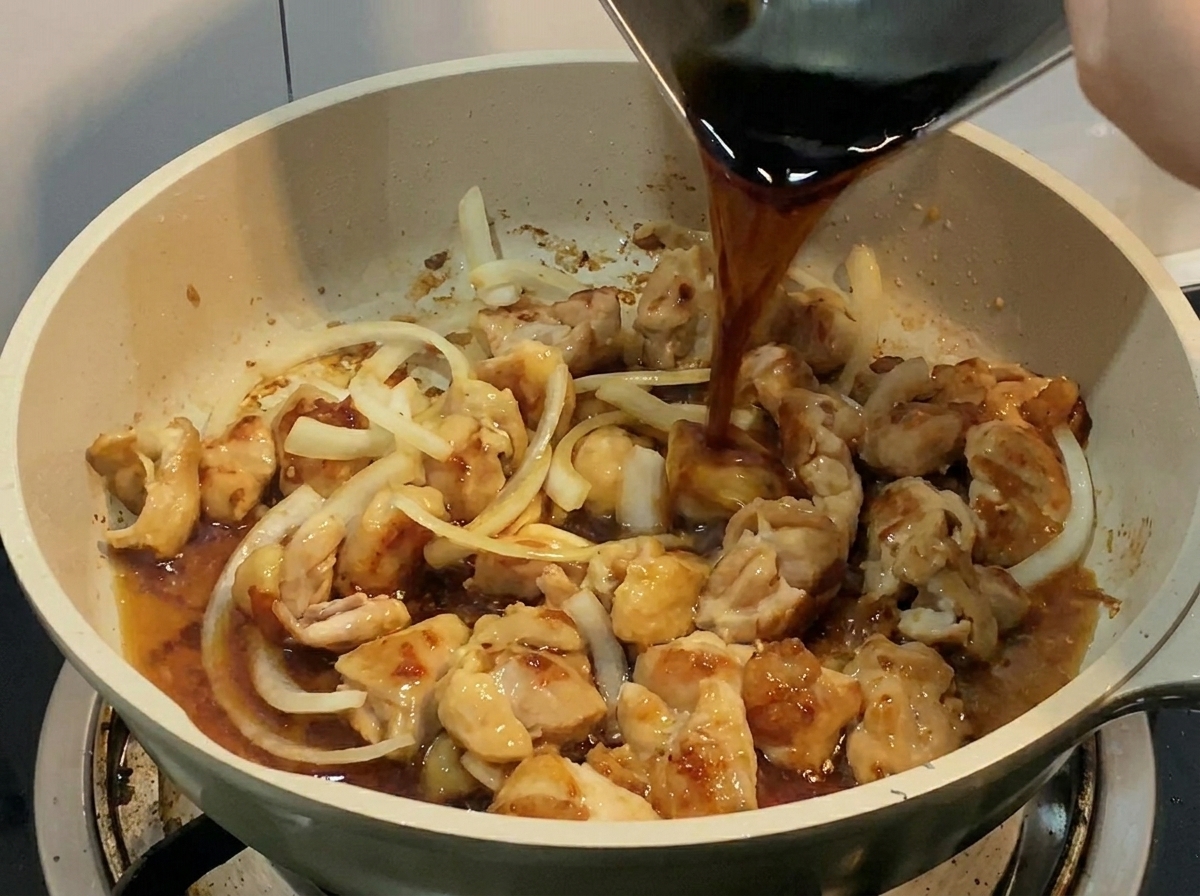
Pour your prepared sauce—a mixture of light soy sauce, mirin, water, and a touch of sugar—directly over the chicken and onions. Ensure the heat is high enough to bring the liquid to a simmer, then cover the pan for about five minutes. This poaching method ensures the chicken stays incredibly tender while absorbing the umami-rich broth.
Tip: A standard ratio is 1 part soy sauce, 1 part mirin, and 4 parts water, but you can adjust the water if you prefer a more concentrated flavor. - 12Simmer the chicken and onions
Place the lid on the pan and let the chicken and onions simmer in the sauce over medium-low heat for about five minutes. This step allows the meat to cook through while the onions soften and absorb the savory, sweet flavors of the soy and mirin base.
Tip: Covering the pan traps steam, which helps the onions cook evenly and prevents the sauce from reducing too quickly. - 13Add the egg mixture
Pour the roughly whisked egg mixture evenly over the simmering chicken and onions in the pan. Distribute it in a circular motion to ensure the egg creates a soft, consistent layer that binds all the ingredients together into a silky topping.
Tip: Dont over-whisk the eggs; leaving visible streaks of yolk and white creates the best texture for a classic Oyakodon. - 14Assemble the rice bowl
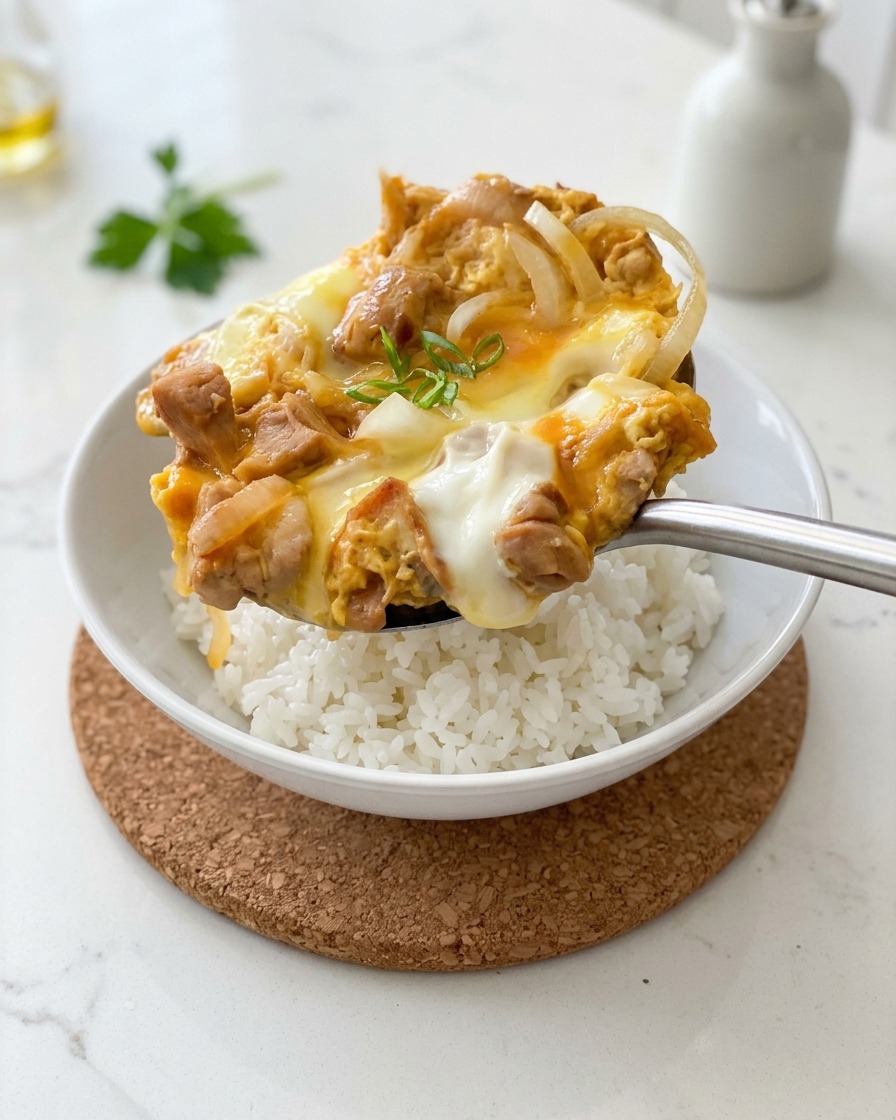
Once the eggs are soft and slightly runny use a large spoon to scoop the chicken and egg mixture. Carefully slide it over your bowl of hot steamed rice. Make sure to pour the extra sauce from the pan so it can soak into the grains for maximum flavor.
Tip: Work quickly so the residual heat does not overcook the eggs because they should stay silky rather than becoming firm. - 15Garnish and serve
Complete the dish by adding the final garnishes. Sprinkle a generous amount of shredded nori seaweed and fresh green onions over the bowl. These toppings provide a bright color contrast and a fresh aroma that cuts through the rich savory flavors of the chicken and egg.
Tip: Add the nori just before eating to ensure it remains crispy and flavorful rather than absorbing too much moisture from the steam.